We recently had a customer ask us for help integrating our Dropzone Widget into one of their website forms, which use Marketo Forms 2.0. One of their requirements was that they need uses to attach a file containing sensitive information when submitting the form. Our secure upload widget seemed like the perfect fit, and it turns out integrating with Marketo was pretty easy. We’ve decided to share the code here for other Marketo customers that may want to do a similar integration.
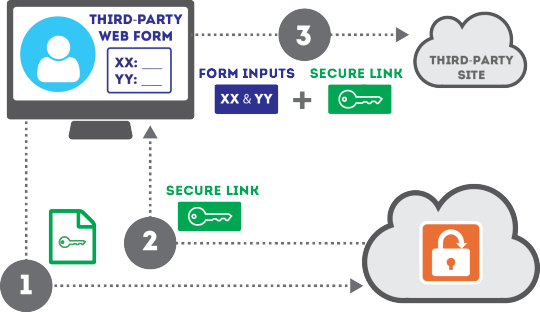
Pretty much every integration of our Dropzone Widget has the same basic data flow. If you are not familiar with how it works, there is a simple diagram below. Essentially anything that is attached using the widget gets encrypted and uploaded directly to SendSafely. The files never touch the site that hosts the form. Instead, we detect when the form gets submitted and add the secure link from SendSafely to one of the form inputs, so the submission can reference the uploaded files.
We’ll start with a vanilla Marketo Form example that follows the same pattern as the examples on the Marketo Developers Site. The initial code for the form (without our integration) is below.
<html>
  <body>
    <script src="https://ajax.googleapis.com/ajax/libs/jquery/2.1.3/jquery.min.js"></script>
    <script src="//app-sjqe.marketo.com/js/forms2/js/forms2.js"></script>
    <form id="mktoForm_1057"></form>

    <script>
      //Load the Marketo form using its form id
      MktoForms2.loadForm("//app-sjst.marketo.com", "785-UHP-775", 1057, function(form){

      //Add a Marketo onSuccess handler to display a message to the user
      form.onSuccess(function(values, followUpUrl){

        //Get the form's jQuery element and replace it with the message
        form.getFormElem().text("Thank you. Your information was submitted.")

        //return false to prevent the submission handler from taking the lead to the follow up url.
        return false;
        });
      });
    </script>
  </body>
</html>
There are two basic steps for adding a Dropzone widget to the Marketo Form. Note that since the Marketo forms are rendered dynamically with JavaScript, our integration is done programmatically using JavaScript in theMktoForms2.loadForm function.
Step 1: Add a placeholder element for the drop zone to render and initialize the Dropzone API with a Dropzone ID
The first thing you’ll need to do is determine where you want to render the file upload dialog. The bottom of the form is usually the best place to do this, below all of the text inputs and above the submit button.
The form’s submit button can be identified by the DIV using the “mktoButtonRow” class, so we insert our placeholder immediately before it. After the placeholder is added, you can initialize the Dropzone API as shown below.
<html>
  <body>
    <script src="https://ajax.googleapis.com/ajax/libs/jquery/2.1.3/jquery.min.js"></script>
    <script src="https://app.sendsafely.com/js/external/SendSafelyDropzone.min.js"></script>
    <script src="//app-sjqe.marketo.com/js/forms2/js/forms2.js"></script>
    <form id="mktoForm_1057"></form>

    <script>
      //Load the Marketo form using its form id
      MktoForms2.loadForm("//app-sjst.marketo.com", "785-UHP-775", 1057, function(form){

        //Add the dropzone placeholder above the Marketo submit button
        form.getFormElem().find(".mktoButtonRow").before("<div id='dropzone-placeholder-div'></div><br>");

        //Initialize the SendSafely Dropzone using a Dropzone ID and the placeholder element
        //Also set the disableAutoSubmit property to TRUE so we can submit using the Marketo events instead
        var widget = new SendSafelyDropzone('your-dropzone-id-here', $('#dropzone-placeholder-div'));
        widget.disableAutoSubmit = true;
        widget.initialize();

        //Add a Marketo onSuccess handler to display a message to the user
        form.onSuccess(function(values, followUpUrl){

          //Get the form's jQuery element and replace it with the message
          form.getFormElem().text("Thank you. Your information was submitted.")

          //return false to prevent the submission handler from taking the lead to the follow up url.
          return false;
        });
      });
    </script>
  </body>
</html>
Note that we also need to include a reference to the SendSafely Dropzone JavaScript API at the top of the document (usually in the same place where you include the Marketo Forms JavaScript).
Step 2: Detect when the user submits the form and notify the widget.
The final step is to detect when the user submits the form and notify the widget so we can append a secure link to the form inputs. Note that when you configured this form in Marketo, you will want to add a hidden field that can be used to store the SendSafely secure link in Marketo (we named ours hiddenLink in this example)
We use the Marketo form.onValidate callback to detect when the user tries to submit the form. This callback fires after each form field is validated, which happens immediately before the form gets submitted.
Note that we only trigger our logic if all of the form validated successfully. We then set the form.submittable property to false to stop the form from submitting until we have notified the Dropzone Widget and populated the secure link in the hiddenLink field. After that, we set form.submittable to true and re-submit the form programmatically usingform.submit().
//Add an onValidate handler to detect when the user presses submit
form.onValidate(function(success){
  //Make sure the Marketo validation succeeds, otherwise do nothing
  if (success)
  {
    //Disable the submit button while the SendSafely API is called to get a secure link
    $(".mktoButton").attr('disabled','disabled').html("Please Wait");

    //If the hidden link field is empty, we need to call finalizePackage to get the link
    if($('input[name=hiddenLink]').val() === "")
    {
      //Set the Marketo Form submittable property to FALSE to prevent it from being submitted
      //until we populate the link (we will re-submit programmatically once finished)
      form.submittable(false);

      //Make sure at least one file was uploaded, otherwise display an alert to the user
      if(widget.nbrOfFilesAttached > 0)
      {
        //Call FinalizePackage to get the secure link
        widget.finalizePackage(function (url) {

          //This is the success callback for finalizePackage
          //Populate the hidden input using the url that is returned
          $('input[name=hiddenLink]').val(url);

          //Change the submittable property to TRUE and submit programmatically
          form.submittable(true);
          form.submit();
        },
        function() {

          //This is the error callback for finalizePackage
          //The Dropzone will display the appropriate error to the user
          $(".mktoButton").removeAttr('disabled').html("Submit");
        });
      }
      else
      {
alert("You must attach at least one file.");
$(".mktoButton").removeAttr('disabled').html("Submit");
      }
    }
  }
  else
  {
    $(".mktoButton").removeAttr('disabled').html("Submit");
  }
});
That’s it! The above logic can be used to integrate a file upload dialog within the any Marketo Form that can be used to upload files securely with SendSafely.